こんにちは.changです.
前回に続いてiOSでDeep Learningをやってみます. サンプルをベースに,自作U-Netの学習済みモデルを使ってSemantic Segmationします.
1. サンプルでSemantic Segmentation
前回,公式からダウンロードしたソースを使います. ソースは,~/Tools/TensorflowLite下にあります.
環境変数を再設定
% echo export PATH='/opt/homebrew/bin:$PATH' >> ~/.bash_profile
% rbenv global 3.1.1
% source ~/.bash_profile
% rbenv versions

% cd ~/Tools/TensorflowLite/examples/lite/examples/image_segmentation/iOS
% pod install
エラーになる

ここ*1で紹介されている方法で解決
% xcode-select --install
% xcode-select --reset
workspaceを生成→プロジェクトを開く
% pod install
% open ./ImageSegmentation.xcworkspace
Bundle IdentifierとTeamを指定してビルド

出来ました😀


2. 自作U-Netのtflite変換
以前に作ったU-Net*2をそのまま使います. Tensorflowで生成されるpbファイルをTensorflowLiteのtfliteファイルに変換するソースのみを書き足しました. 今回は(高速化の為の)量子化等はせず,単純に変換だけ行います.
pb_to_tflite.py
import numpy as np
import os
import tensorflow as tf

dir = "./u-net"
input_model = dir + "/output"
output_model = dir + "/models/unet_dagm_256.tflite"

#to tensorflow lite
converter = tf.lite.TFLiteConverter.from_saved_model(input_model)
tflite_quant_model = converter.convert()
if not os.path.exists(dir + "/models"):
    os.mkdir(dir + "/models")
with open(output_model, 'wb') as o_:
    o_.write(tflite_quant_model)
Note: 変換はLinux上で行いました.
3. 自作U-NetをiPhone内で推論
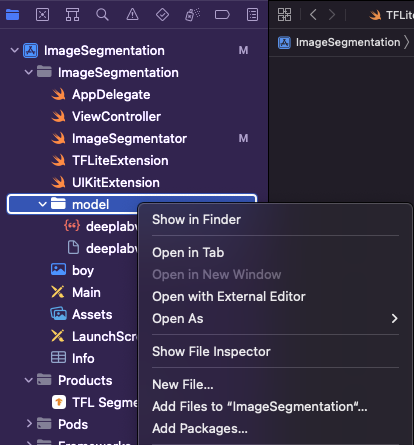
(1) tfliteをプロジェクトに追加
上で変換したtfilteをGoogleドライブ経由でMacに移植しました. 更に,examples/lite/examples/image_segmentation/ios/ImageSegmentation/modelにコピーし,プロジェクトに追加しました.
(2) 自作モデルの読み込み
ソース内で定義されていたモデル名を指定.
ImageSegmentator.swift
  static let modelFileName = "unet_dagm_256"
  static let modelFileExtension = "tflite"
デバッグ実行するとエラーになりました. ちなみに,Androidでは同様に変換したtfliteを読めました. iOSでは独自の変換が要るという事でしょうか?

4. むすび
時間掛かりそうなので,一度区切ります. 集中すれば出来そうなんだけどなぁ😮💨